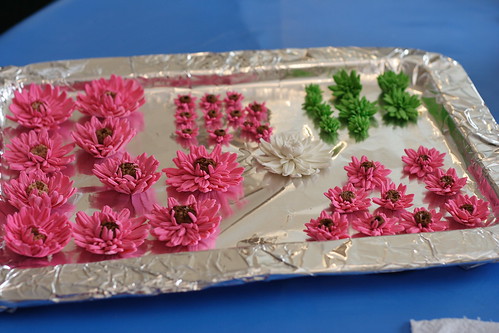
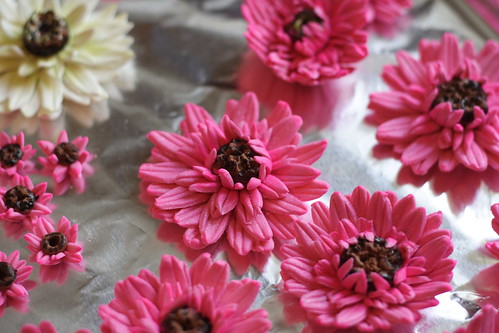
Making gum paste gerbera daisy
Remember my “wedding cake to remember”? 🙂
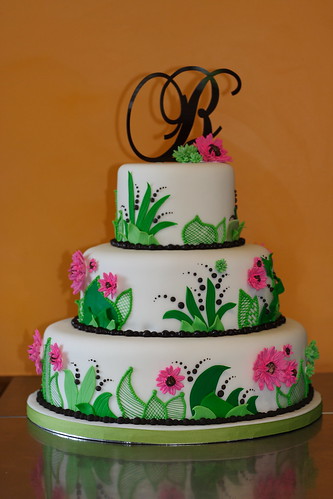
Well, I had quite the trouble with the Gerbera daisy cutter I ordered from Global sugar art and I definitely don’t recommend it, but because I was in a hurry to make the flowers for the wedding cake, I had to improvise.
Here is a quick and inexpensive way to make Gerbera daisies with a regular Wilton Daisy cut out set!
* I have used the Scott Clark Woolley’s gum paste recipe, he gave a very nice detailed instruction, so check out the recipe!
You will need:
– a walnut size gum paste
– a small rolling pin
– the Wilton daisy cut outs
– some corn starch
– something to cover your gum paste ( a box, a bag, a cup…)
– something with oval shape to form the daisies ( I’ve used Christmas ornaments that open and you can turn them around. Anything that has a similar shape will work!)
– a ruler or a large spatula like gum paste tool to form the middle
– a ball shape gum paste tool ( or something like it)
– small brush and water
* Note: You don’t have to use particular tools for this! If you find something with a useful shape, you can use virtually anything!
Making the Gerbera daisy- read the instructions and then watch the movie!
You will need three of these large cut outs for the base of the flower!
(Part 1)
1. Roll out the gum paste. Cut a large daisy cut out and cover the rest of the gum paste.
2. Round the edges of each petal with something that you have handy.
3. With a ruler or the spatula gum paste tool make 3 lines on each petal as shown.
4. Let the petal dry on top of a ball shape so it can round around the base.
5. Repeat with the rest of the cut outs.
(Part 2 )
You will need 3 medium size Daisy cut outs!
6. Cut 3 medium size Daisy cut outs.
7. Take two of the medium size cut outs and cut each petal lengthwise 2 or 3 times as shown in the video.
8. On the third cut out make straight line impressions with a ruler of a spatula, same way as with the big cut outs.
9. Take the big cut outs and until they are fully formed, round the edges on the ball shape tool as shown in the video.( ONLY the edges, not the whole petal!)
10. Let all of them dry with the petals down!
(Part 3)
11. Take a darker color gum paste and make a ball the size of a large blueberry.
12. Make an impression on it with the large ball shape gum paste tool and then “pinch” the edges with tweezers.
13. Wet the edges with a small brush and water.
14. Take the medium cut out with the cut edges lengthwise and arrange it around the darker middle with the help of the tweezers.( It doesn’t have to be perfect, in fact if it’s not perfect it’s better, because flowers in nature are not perfect, that’s what makes them perfect the way they are!). Let it dry for a couple of minutes.
(Part 4 )
15. Take the middle of the flower that we finished in part 3 and wet the sides and the bottom with a brush ( don’t use too much water! Just barely damp brush!) and glue the 2nd medium size cut out with lengthwise cut petals while arranging them around as shown in the video. Let it dry for a little bit.
16. Take the 3 pieces large cut outs and wet the center ( on top) top on each one of them, then arrange one on top of the other, so each of the petals to be visible when looking from above.
17. Press with the ball shape tool in the middle ever so slightly.
18. Add the medium size cut out that you have left on top of the 3 large sized ones as shown in the video.
19. Brush some water in the center and add the middle of the flower that we had left to dry. Press with the small ball shape tool to go through all of the cut outs. Rearrange the petals with the tweezers if needed.
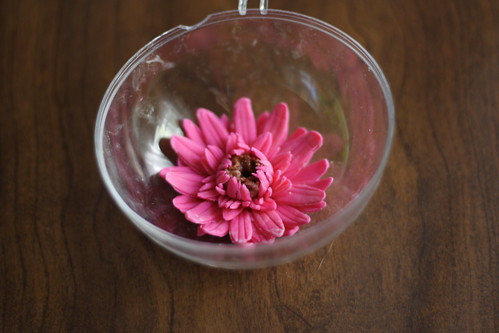
20. Take the flower and place it in an oval shape to dry. Leave it for at least 12-14 hours, the longer, the better!